First locate a wool sweater, second hand stores probably have some in stock. I have heard that you can use wool blends, but don't get a blend with less than 80% wool for the best absorption. And make sure that the blend doesn't contain cotton or rayon, polyester is fine. All this will be located on the tag of the sweater, if it isn't located at the neckline look at the side seam at about waist height. If there is no information on the sweater and you are uncertain about the material, then do not use it for this purpose. HOWEVER, you can make the pants if you want to just don't count on them wicking away pee like 100% wool would. One tip is that wool sweaters should be labeled dry clean only.
It has often been recommended that you "felt" the wool to bind the fibers together more. You do not have to do this, but it will make the spaces in the knit smaller and the knit tighter. If the sweater is a very bulky one I don't think you have to do this at all. And on the ones that I have that are fine morino wool, I don't even think that they felted when I processed them.
In order to felt your sweaters you wash them with hot water and detergent, then throw them in the dryer on high. Ta-da, hands free felting! Both of these things would normally "ruin" your sweater, because it felts the wool, hence the dry clean only label.
This is the sweater I found, 100% fine morino and didn't seem to felt too much. When sewing this project you should sew with a zig zag stitch to keep every thing nice and stretchy and to help keep those knitted fibers all encased.
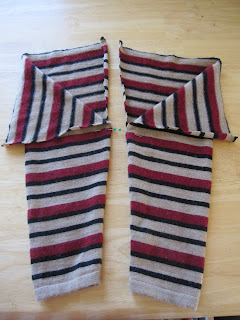
First step is to cut off the sleeves to the length you need. You can find out how long you need by measuring a pair of your baby's current pants and adding a bit for growing into. The green pins that you see a bit more than half way up are marking where the legs end and the crotch seam will begin. Again you can use a current pair of pants to find the this spot and mark it a bit higher than that for growth.
Next you cut from the top down to the spot you marked. I cut very close to the seam on both the front and the back of each sleeve in order to remove the seam completely because it was bulky.
There is a trick you can use when sewing the two legs together and this pic doesn't show it too well sorry. You flip ONE leg inside out and leave the other right side out. Slip the right side out sleeve INTO the inside out sleeve and pin them together from the top edge to the crotch and back up to the other top side. This pic shows me having pinned from the top edge to the crotch seam so that you could see how I slipped one inside the other. When you sew it like this it keeps the raw edges of the seam on the inside of the pants where it belongs and keeps all the material safely tucked away so that you don't accidentally sew something into the seam that doesn't belong there. I have done it!
When you get it all pinned sew together in one long seam. I like to back stitch over the dead center of the crotch where the legs seams are just to strengthen the seams.
Starting to look like pants?
To add a waist band cut off more material. Measure the length of the pants you just made across the front from hip to hip and double it, this will give you the length you need. My elastic was 1 inch so I made the strip for the waistband about 4 inches wide. I wasn't specific because I used a scrap from the sweater and it just happened to be about 4 inches.
What I did was fold the material over the elastic with the right side of the material facing out, zig zag stitch near the elastic without catching any elastic with the needle, then trim off the excess material near the stitching.
In this photo you can see where I put a yellow pin (at the top of the pic) and green pin (at the bottom of the pic) in order to mark the exact opposite ends of the band.
Then I brought the yellow and green pins together and marked the "new" opposite edges again with pins in this photo green at the top and blue at the bottom. This marked the waist band at 4 spots equal distance from each other. I then put 4 more pins exactly half way between each of the original ones for a total of 8 pins. I did the same thing with the pants. I do it this way because I hate measuring!
Then with the pants turned inside out and the waistband on the inside of that I matched up the pins and attached the pieces together. When I sewed it I simply stretched the waistband as I went to match the length of the pants.
This is what they look like finished. There are a few other ways to make pants like this, but for me this worked out just fine. I was also able to use the same sweater to make 2 other items, a larger pair of pants and a hat.


